How to use query designer
Published: 2025-05-23
For many analysts, testers, project managers and power‑users, the toughest part of working with an SQL database is… SQL.
DbGate’s Query Designer lets you build powerful queries by dragging tables onto a canvas, choosing the columns you want to see, and defining filters with simple dropdowns – all without writing a single line of code.
Key advantages
- Zero‑SQL learning curve – you interact with tables and joins visually.
- Fast results – the designer still produces a true SQL statement executed by the database, so you keep native speed.
- Safe exploration – the tool is read‑only by default; you won’t accidentally update data.
- Reusable – save any designer page as a Saved Query so you can re‑run it later or share it with colleagues. And with upcoming release 6.5, it will be possible also to save designer queries to DbGate cloud
Tutorial
This tutorial shows step-by-step, how to use query designer to select data from DbGate
Step 1 - Connect to Your Database
- Open DbGate and click File/New connection in the main menu.
- Pick your database engine and enter the connection parameters.
- Click Connect. Your new connection appears under Connections.
Step 2 - Open the Query Designer
- Right‑click any database and choose “Design query”, or
- Right click any table and choose “Design query” - this will open query designer with this table
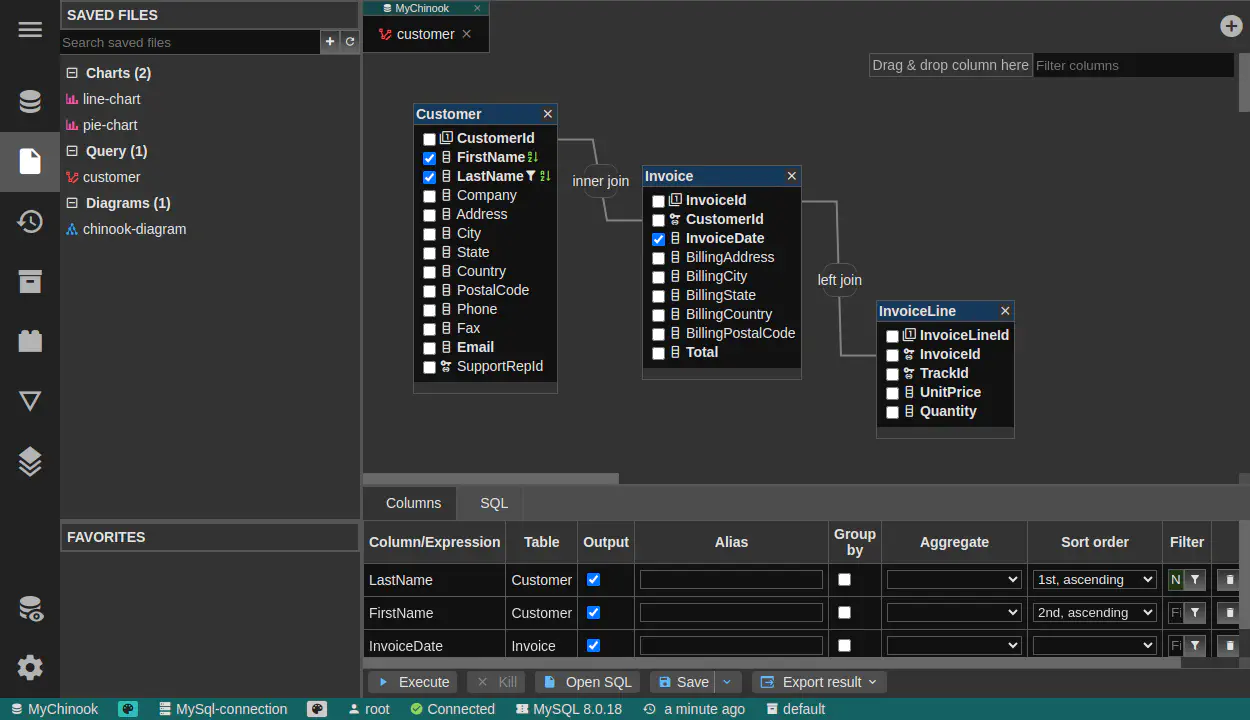
Step 3 - Add Tables and Joins
- Drag & drop tables into query designer canvas
- Drag & drop columns for creating joins
Step 4 - Select Columns to Display
- The Columns grid (bottom panel) lists every column from the tables you added.
- Tick the checkbox in “Output” columns if you want it in the result set.
- Optionally rename a column in the Alias column – helpful for readability.
Step 5 - Filter and Sort Rows
- Use DbGate powerful filtering options to define filter on columns
- Use button “Add OR condition” to add more conditions
- Use “Sort order” field for defining column used for sort
- Use “Aggregate” dropdown for COUNT, SUM, AVG, etc., if you need totals.
Step 6 - Preview & Run the Query
- Use the “Execute” button (or hit Ctrl + Enter) to execute.
- The designer shows a Results grid – paginate, copy, or quick‑filter like in any data editor.
Behind the scenes: DbGate has already generated a full SQL statement. Choose “SQL” tab to see the code – great for learning!
Step 7 - Preview & Run the Query
- Choose Export and pick CSV, Excel (.xlsx), JSON, or NDJSON.
- Confirm and choose a location – DbGate writes the file, ready for reports or BI tools.
Next Steps
- Explore Perspectives for combining SQL tables with MongoDB collections visually.
- Try the AI Assistant in the Query editor to generate queries from natural language descriptions.
Use query designer now!
Query designer is exclusive part of DbGate Premium and Team Premium editions. Download DbGate Premium now!